XRecorder PC: Complete Guide to Screen Recording on Windows
If you've been searching for a solid screen recording solution for your Windows PC, you've probably come across XRecorder. Originally designed as a mobile app, many users wonder how to get xrecorder pc functionality on their desktop computers. While XRecorder doesn't have an official PC version as of 2026, there are several ways to use similar functionality on Windows, along with plenty of alternatives that deliver the same features you'd expect. Let's dive into everything you need to know about screen recording on PC and how to get the most out of your recording setup.
Understanding XRecorder and PC Compatibility
XRecorder made its name as a powerful mobile screen recorder for Android devices, offering features like no watermarks, no time limits, and easy sharing options. The app's popularity has led many people to search for xrecorder pc versions to bring that same simplicity to their desktop workflows.
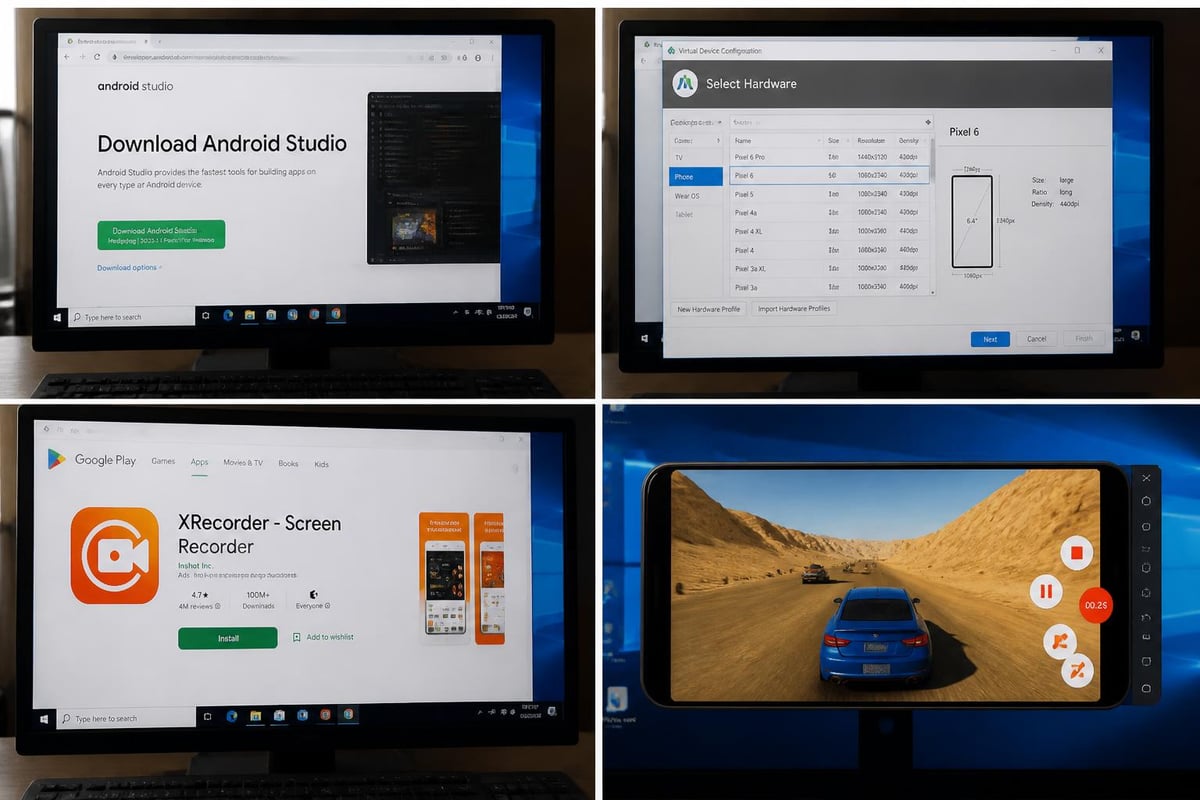
The reality is that XRecorder's developers focused primarily on mobile platforms. However, you can run XRecorder on PC through Android emulators like BlueStacks or NoxPlayer. These emulators create a virtual Android environment on your Windows computer, letting you install and run mobile apps just like you would on a phone.
Using Android Emulators for XRecorder
Here's how the emulator approach works:
- Download and install an Android emulator on your Windows PC
- Launch the emulator and sign in with your Google account
- Open the Google Play Store within the emulator
- Search for XRecorder and install it
- Configure recording settings and start capturing
Keep in mind: This method adds complexity and uses more system resources than native Windows applications. The emulator itself needs RAM and processing power, which can slow down older computers.
Native Windows Screen Recording Alternatives
Instead of wrestling with emulators, you'll probably find better results using screen recording software built specifically for Windows. Free screen recording software has come a long way in recent years, offering professional-grade features without the price tag.
Built-in Windows Recording Tools
Windows 11 and Windows 10 come with several native recording options that many people overlook:
Xbox Game Bar is Microsoft's built-in recording tool. Press Win + G to open it, and you can start recording immediately. It's designed for gaming but works perfectly for any application.
Snipping Tool in Windows 11 now includes screen recording capabilities. The updated Snipping Tool lets you capture both screenshots and video clips, making it surprisingly versatile for quick recordings.
| Feature | Xbox Game Bar | Snipping Tool | XRecorder (via Emulator) |
|---|---|---|---|
| Setup Time | Instant | Instant | 15-30 minutes |
| System Impact | Low | Very Low | High |
| Video Quality | Up to 1080p | 1080p | Depends on emulator |
| Audio Recording | Yes | Yes | Yes |
| Editing Tools | Basic | Basic | Moderate |
Professional XRecorder PC Alternatives for 2026
If you need more advanced features than Windows' built-in tools provide, several professional options deliver exceptional screen recording capabilities on PC.
Top Screen Recording Software Options
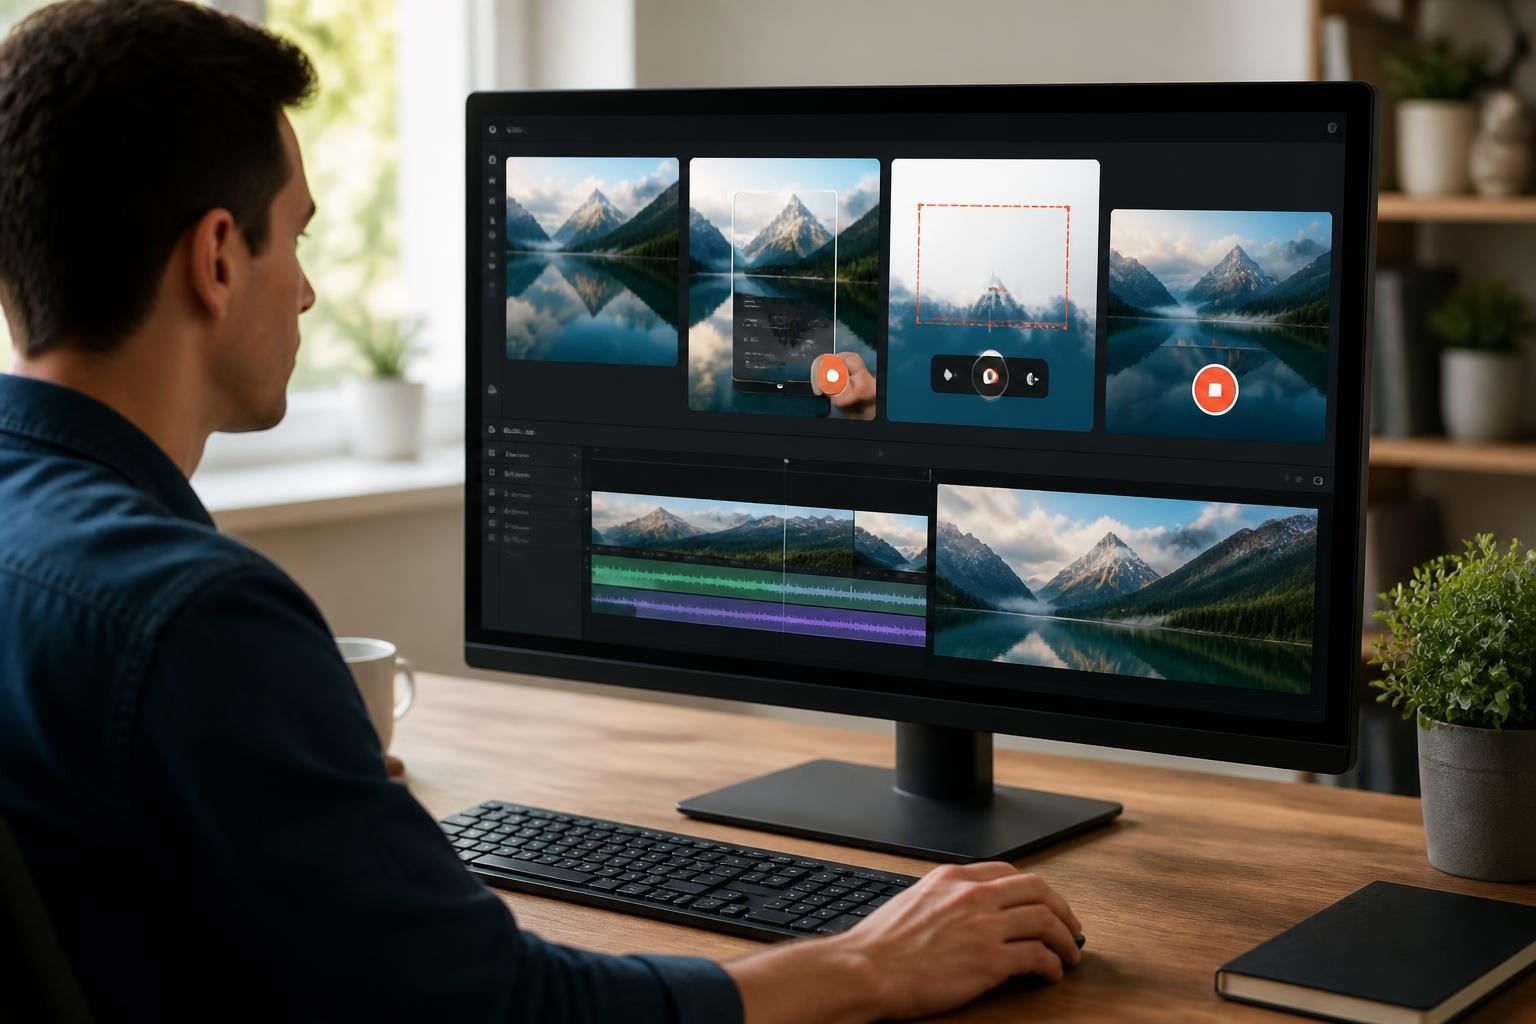
OBS Studio remains the gold standard for free, open-source recording. It offers unlimited recording time, multiple sources, and extensive customization. The learning curve is steeper, but the results are professional-quality.
Loom provides browser-based recording that's incredibly user-friendly. Their Windows screen recorder captures up to 4K resolution and includes webcam overlay options, making it perfect for creating tutorials and presentations.
For those wanting an intuitive experience similar to xrecorder pc functionality, iTop Screen Recorder delivers flexible recording modes and real-time annotation. You can download iTop for free and start recording within minutes.
- No watermarks on free versions (varies by software)
- Customizable recording areas (full screen, window, or region)
- Audio mixing from multiple sources
- Webcam overlay capabilities
- Built-in editing tools for trimming and annotations
Choosing the Right Recording Software
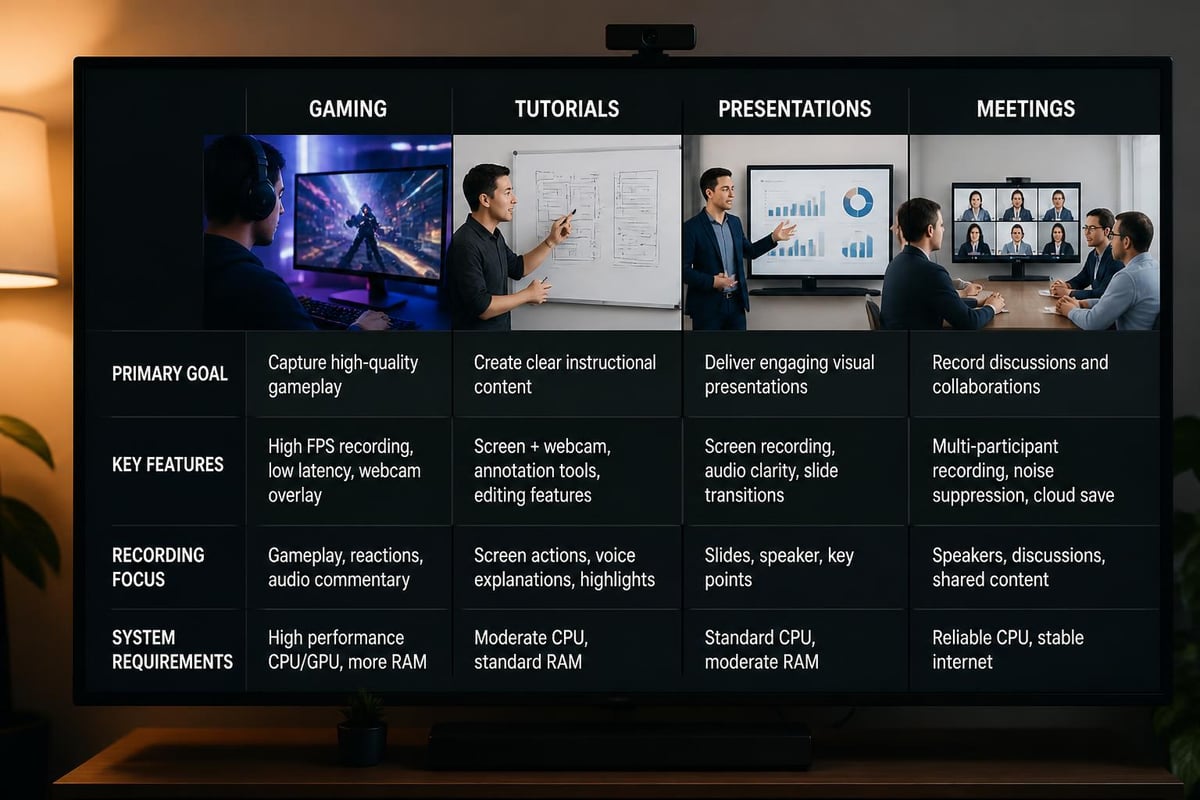
Your perfect screen recorder depends on what you're actually recording. Gaming content needs high frame rates and minimal performance impact. Tutorial videos benefit from annotation tools and cursor highlighting. Business presentations require professional quality and easy sharing options.
Consider these factors when evaluating xrecorder pc alternatives:
- Recording quality and frame rate requirements
- Ease of sharing and collaboration features
- Storage space and video file sizes
- Editing capabilities included
- Privacy and security options
Setting Up Your PC for Optimal Screen Recording
Getting good results from any screen recording software, including xrecorder pc alternatives, requires proper system configuration. Even powerful computers can struggle with recording if settings aren't optimized.
Hardware Requirements and Optimization
RAM matters more than you'd think. Screen recording stores video data in memory before writing it to disk. Aim for at least 8GB RAM for basic recording, but 16GB or more makes everything smoother.
Storage speed impacts recording quality. Recording to an SSD instead of a traditional hard drive reduces dropped frames and ensures smooth playback. If you're recording frequently, consider dedicating an SSD specifically for capture files.
Your graphics card handles encoding in many modern recording applications. NVIDIA's NVENC and AMD's VCE provide hardware-accelerated encoding that barely impacts system performance. Check if your recording software supports GPU encoding.
Audio Configuration Tips
Audio problems plague screen recordings more often than video issues. Here's how to avoid the most common pitfalls:
- Set the correct audio input before starting your recording
- Test audio levels to prevent clipping or barely audible sound
- Disable notification sounds that might interrupt your recording
- Use a dedicated microphone instead of laptop built-in mics when possible
- Record system audio and microphone on separate tracks for easier editing
Recording Workflows and Best Practices
Creating high-quality screen recordings involves more than just hitting the record button. Professional content creators follow specific workflows that ensure consistent, polished results every time.
Pre-Recording Checklist
Before you start recording with any xrecorder pc alternative, run through this quick checklist:
Close unnecessary applications to reduce distractions and improve performance. Those browser tabs you're "definitely going to read later"? Close them.
Clean up your desktop if you'll be showing it. A cluttered desktop looks unprofessional and can distract viewers from your actual content.
Prepare your script or outline. Even informal videos benefit from knowing what you'll cover and in what order.
Set up your recording area. Position windows, open necessary applications, and test that everything appears correctly in your recording preview.
| Recording Type | Recommended Resolution | Frame Rate | File Format |
|---|---|---|---|
| Tutorials | 1920x1080 | 30 fps | MP4 |
| Gaming | 2560x1440 | 60 fps | MP4 |
| Presentations | 1920x1080 | 30 fps | MP4 or WebM |
| Quick Demos | 1280x720 | 30 fps | MP4 |
During the Recording
Speak clearly and at a steady pace. You can always speed up silent portions during editing, but fixing unclear audio is nearly impossible.
Use keyboard shortcuts instead of clicking through menus. Most recording software lets you pause, resume, and stop recording with hotkeys, keeping your hands on the keyboard for a smoother workflow.
Take pauses when you make mistakes. Don't stop the recording entirely. Pause, collect your thoughts, and continue. You'll edit out the pause later, and this saves you from multiple takes.
If you're creating content that needs to be searchable and easy to review later, browser-based tools like Mool convert your screen recordings into searchable knowledge with AI-powered features, making it simple for teams to find and reference specific moments in your videos.
Advanced Recording Techniques
Once you're comfortable with basic recording, these advanced techniques help you create more professional, engaging content.
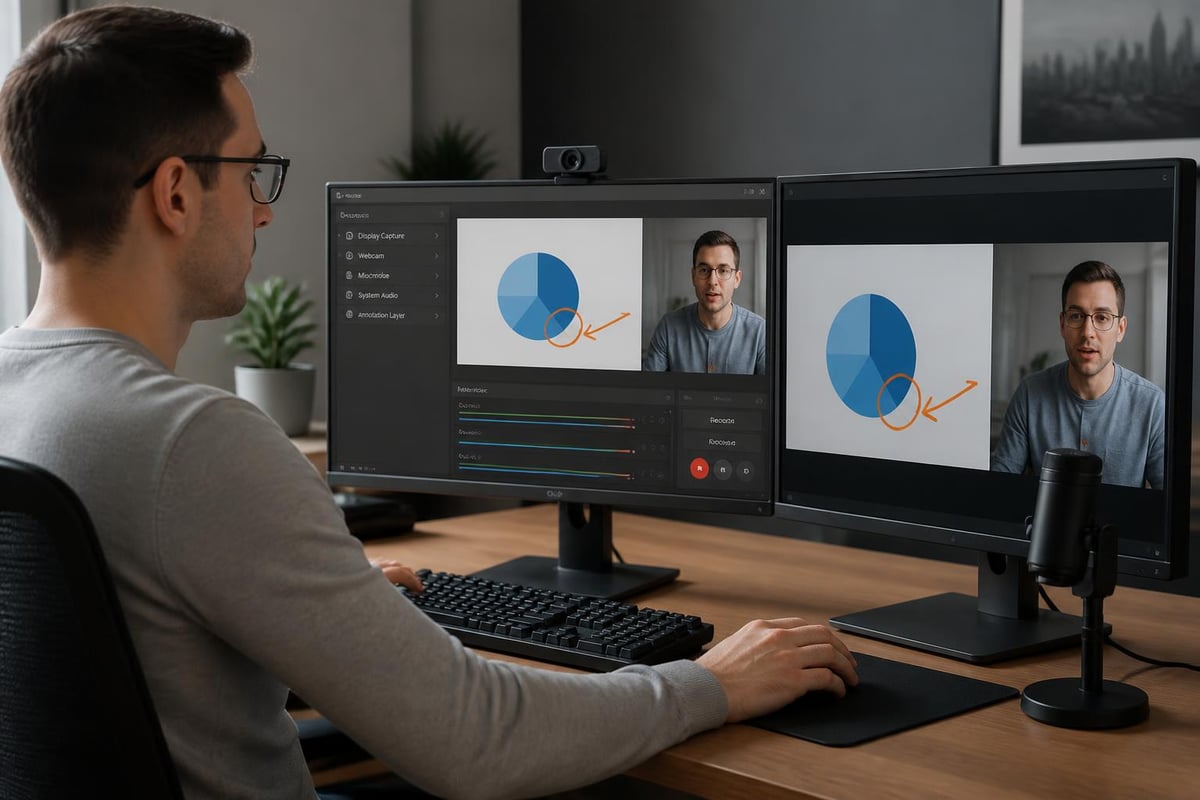
Multi-Source Recording
Recording from multiple sources simultaneously creates more dynamic content. Combine your screen, webcam, and multiple audio sources to create picture-in-picture tutorials or reaction videos.
Most professional xrecorder pc alternatives support multiple video sources. Position your webcam in a corner, set up your screen as the main source, and you've got a professional-looking tutorial setup.
Annotation and Highlighting
Drawing attention to specific screen elements makes tutorials easier to follow. Real-time annotation tools let you:
- Circle or highlight important buttons as you click them
- Draw arrows pointing to relevant screen areas
- Add text callouts explaining what you're doing
- Use cursor effects that make your mouse pointer more visible
File Management and Storage Solutions
Screen recordings eat up storage space quickly. A 10-minute 1080p recording can easily reach 1-2GB depending on your settings. Managing these files efficiently prevents your hard drive from filling up and makes finding specific recordings easier.
Organizing Your Recordings
Create a dedicated folder structure for your recordings:
Screen Recordings/
├── 2026/
│   ├── January/
│   ├── February/
│   └── March/
├── Projects/
│   ├── Client_A/
│   ├── Client_B/
│   └── Internal/
└── Archive/
Name files descriptively immediately after recording. "Screen Recording 2026-05-06 at 2.43.17 PM" tells you nothing. "Product Demo v2 Client Presentation" tells you everything.
Compression and Conversion
Raw recordings are huge. Compressing them reduces file size while maintaining acceptable quality for most purposes.
HandBrake is free, open-source software that converts and compresses video files efficiently. Use the "Fast 1080p30" preset for most recordings, which balances quality and file size nicely.
Cloud storage considerations: If you're backing up recordings to cloud services, compress them first. Uploading a 10GB raw file takes forever and burns through your storage quota fast.
Sharing and Collaboration Features
Creating screen recordings is only half the battle. Getting them to the people who need to see them matters just as much.
Quick Sharing Options
Modern screen recording tools focus heavily on sharing capabilities. Screen recording platforms now offer instant link generation, letting you share recordings seconds after finishing them.
Direct upload to cloud services beats downloading locally then uploading manually. Many xrecorder pc alternatives integrate with YouTube, Google Drive, Dropbox, and other platforms.
Password protection matters for sensitive content. Business recordings often contain confidential information that shouldn't be publicly accessible.
Team Collaboration Features
If you're creating recordings for team consumption, collaboration features become essential:
- Timestamp comments let viewers ask questions about specific moments
- Annotation tools enable reviewers to mark up recordings
- Version control tracks changes when you update recordings
- Analytics show who watched and for how long
The Mool platform includes these collaboration features built-in, making it simple for teams to work together on video content without juggling multiple tools.
Troubleshooting Common Recording Issues
Even the best screen recording setup runs into problems occasionally. Here's how to fix the most common issues quickly.
Video Quality Problems
Choppy or laggy recordings usually indicate your computer can't keep up with the encoding requirements. Solutions include:
- Lower your recording resolution from 1080p to 720p
- Reduce frame rate from 60fps to 30fps
- Close resource-intensive background applications
- Enable hardware encoding in your recording software settings
- Update your graphics card drivers
Blurry or pixelated video happens when bitrate is too low. Increase your bitrate settings (12-15 Mbps works well for 1080p recordings).
Audio Sync Issues
Audio drifting out of sync with video frustrates viewers more than almost any other problem. This typically occurs with longer recordings when frame rates vary.
Fix audio sync by:
- Recording at constant frame rate (CFR) instead of variable (VFR)
- Using dedicated audio recording software separately, then syncing in post
- Keeping recordings under 20-30 minutes and stitching them together if needed
- Updating your recording software to the latest version
File Corruption and Recovery
Unexpected crashes during recording can corrupt video files. Some recording software includes recovery features that salvage recordings from crashed sessions.
Prevention strategies:
- Save recordings to a local drive, not network storage
- Ensure you have plenty of free disk space (at least 20-30GB)
- Don't open other heavy applications while recording
- Restart your computer before important long recordings
Privacy and Security Considerations
Screen recordings often capture sensitive information unintentionally. Taking privacy seriously protects both you and the people who appear in your recordings.
What to Watch Out For
Browser tabs and bookmarks can reveal private information. Close tabs containing personal emails, financial information, or confidential documents before recording.
Notifications pop up at the worst times. Windows notifications, email alerts, and messaging apps can expose private conversations. Enable "Do Not Disturb" mode before recording.
System tray icons sometimes show applications you'd rather not advertise. VPN clients, productivity monitoring software, or personal apps might appear in recordings.
Secure Recording Practices
When recording work-related content with xrecorder pc alternatives, follow these security guidelines:
- Review recordings before sharing to catch accidentally captured sensitive data
- Blur or edit out confidential information in post-production
- Use password protection for recordings containing any business information
- Set expiration dates on shared links for temporary access
- Track viewer analytics to know who accessed your recordings
Selecting the Best Recording Mode
Different situations call for different recording approaches. Understanding which mode fits your needs helps you work more efficiently.
Full Screen vs. Window Recording
Full screen recording captures everything, making it ideal for demonstrations that involve switching between multiple applications. However, it also captures desktop notifications and other distractions.
Window recording focuses on a single application window. The recording stays focused even if you move or resize the window, which creates cleaner, more professional results for single-app tutorials.
Custom region recording lets you define exactly which portion of your screen to capture. This works perfectly for recording specific sections of web pages or applications without capturing surrounding interface elements.
Webcam Integration Strategies
Adding your webcam feed creates more personal, engaging content. Position matters:
- Corner placement: Traditional and professional, doesn't obscure important content
- Side panel: Good for presentations where you're explaining slides
- Full screen during introductions: Switch to corner placement during demonstrations
- No webcam: Perfectly fine for pure tutorials where your face adds nothing
Performance Optimization for Recording
Squeezing the best performance from your xrecorder pc setup or alternative software requires understanding how recording impacts system resources.
CPU vs. GPU Encoding
CPU encoding (x264) produces smaller file sizes with better quality but uses significant processor power. This can impact performance in games or resource-intensive applications you're recording.
GPU encoding (NVENC, QuickSync, VCE) offloads encoding to your graphics card, barely impacting CPU performance. Quality is slightly lower than CPU encoding, but the performance benefit is substantial.
For most users, GPU encoding provides the best balance. You'll get smooth recordings without noticeable quality loss.
Managing System Resources
Recording while working requires careful resource management:
- Close browser tabs you're not using (Chrome especially loves RAM)
- Disable automatic updates during recording sessions
- Quit cloud sync services temporarily (they can spike CPU usage unexpectedly)
- Monitor your CPU and RAM usage with Task Manager before starting
Scheduled recordings should run when your computer has minimal other tasks. Recording overnight or during lunch breaks ensures maximum resources are available.
Screen recording on PC has evolved far beyond what xrecorder pc users might expect, with powerful native Windows tools and professional alternatives offering features for every need. Whether you're using built-in options like Xbox Game Bar, professional software like OBS, or specialized platforms, getting great results comes down to proper setup and understanding your tools. If you're looking for a streamlined solution that handles recording, sharing, and makes your content searchable with AI-powered features, check out Mool to see how browser-based recording can simplify your entire workflow.